This guide will take you through every step necessary to get started with using OBS NDI and provide some insights into its performance. Make sure to read each step carefully so that you can get everything set up correctly.
Does OBS NDI Work? Is It Better Than a Capture Card?
Before I begin, let’s talk about NDI’s performance. I’ve been using it myself to both stream and record and my experience has been exceptional. So long as you are wired to your router with ethernet cables, you’ll get a crispy smooth performance. The quality is indistinguishable from streaming on a single PC setup. On top of this, you aren’t limited by frame rate or resolution – some capture cards, like the Elgato HD60S, force you to play and stream in 1080p 60fps – it only has HDMI. But because you’ll be using your network to send everything to your streaming PC, you can stick with your display port and get higher frames and resolutions.
How To Set Up OBS NDI On Both PCs
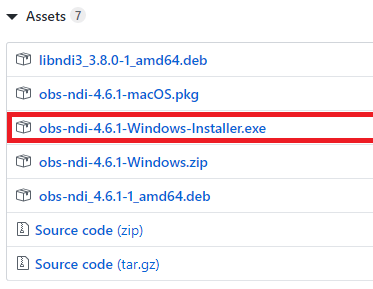
First, you must download and install OBS on both PCs. We will start with our gaming PC. We will come to our streaming PC later.On your gaming PC, close OBS. Visit this page to download the OBS NDI plugin. Click download, scroll down and click obs-ndi-4.6.1-Windows-Installer.exe.
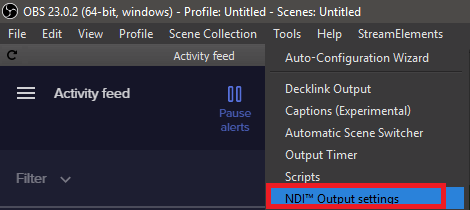
Go through the installation process. Once the installation process has finished, you will be asked to restart your gaming PC. Once your gaming PC is back on, open OBS again. From within OBS, click tools, then click NDI Output settings.
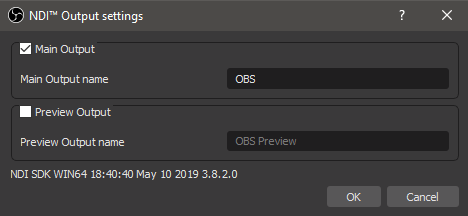
A new window will appear. Click to tick Main Output and give it a name. You will need to find this name later on your streaming PC.
You’ve now finished the necessary steps on your gaming PC. Later, you can add your own scenes, capture devices, and adjust your audio and video. First though, let’s look at the steps needed to complete on your streaming PC.
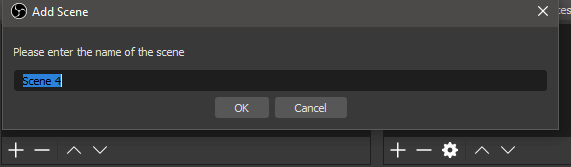
On your streaming PC, open OBS and click the + button at the bottom left in the scenes box to add a new scene.
Give it a name and click OK. Next, in the sources box, click the + button and click NDI Source.
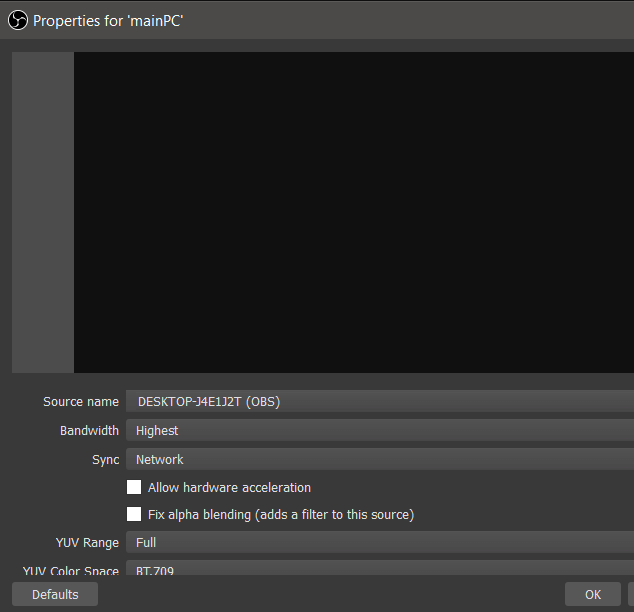
Click the Source name box and select your PC – you should find the name you set here before in brackets. Ensure bandwidth is set to Highest. You can keep all of the other settings as default. Click OK.
You will now see that everything on your streaming PC’s OBS will reflect what is shown on your gaming PC’s OBS. This gives you the control to edit and make adjustments whilst live without touching your streaming PC.
Getting Ready To Go Live With OBS NDI
You are now ready for your first stream, but there are a number of things you need to consider before starting.
Firstly, you will need to input your stream key into the streaming PC. You should also click the start streaming and/or start recording buttons on your streaming PC.You only need the one OBS NDI source and scene active on your streaming PC – all other scenes and sources can be switched, edited, and changed from your gaming PC.If you notice any difficulties, ensure your video settings are identical on each copy of OBS. For example, if on your gaming PC you record at 1920×1080 but rescale your streaming output to 1280×720, do the same on the streaming PC.Finally, both PCs must have OBS open at all times for the stream to run.
Summary
That’s my guide to streaming with OBS NDI. It’s surprisingly simple to set up, requires no hardware adjustments, and you are able to stream in your native resolution and frame rate.