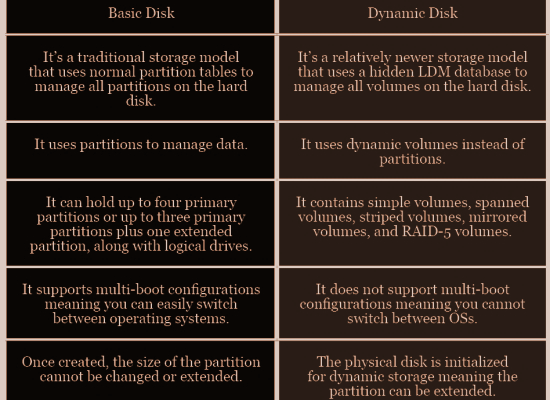
The basic disk provides a simple storage solution, and allows for the creation and deletion of primary and extended partitions, the creation and deletion of logical drives within an extended partition, and the ability to format a partition and mark it as active. A dynamic disk will provide features that are not possible on a basic disk. They allow the partitioning of various volume types such as spanned, striped, mirrored, and RAID-5. These disks tend to offer greater flexibility for volume management. Since the release of Windows 10, dynamic disks have been deprecated and are generally no longer recommended for use. One of the primary reasons that a dynamic disk is no longer considered useful is the introduction of newer Storage Spaces technology that can help protect your data from drive failures. A long-standing problem with dynamic disks is the inevitability they become faulty, causing drive failures and the need to revert back to basic disk.
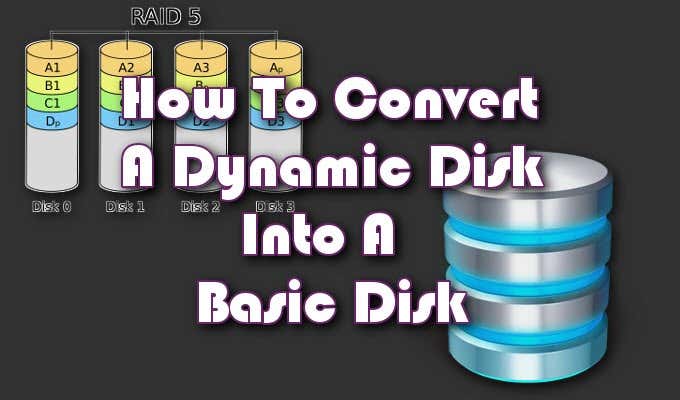
How To Convert a Dynamic Disk Into a Basic Disk
A great thing about both disks is that they’re interconvertible, meaning you can convert one into the other and vice-versa. The ways in which this is possible is two-fold; through the Disk Management tool or Command Prompt. There are third-party tools you can use that are supposed to streamline the whole process. You can seek one out if you’d prefer though we can’t personally recommend any. The process will require some computer competency but is relatively easy even for a novice. We’ll attempt to simplify both conversion methods and aid you in how you can convert a dynamic disk, failed or otherwise, into a basic disk. Before you begin it is crucial that you back up all of the volumes located on the dynamic disk. Both conversion processes will wipe away all data completely during the transfer.
Conversion Method 1 – Disk Management
Likely the easiest method of the two due to the least effort involved, we’ll begin converting your dynamic disk into a basic disk using the Disk Management tool.
Basic Into Dynamic Using the Disk Management Tool
On the flipside, converting a basic disk into a dynamic disk will not require a data back up. So, if for some reason you feel the need to revert the dynamic to basic change, it’s as simple as following an on-screen Wizard. You may receive a warning when attempting this change. The first informing you that the installation of an operating system from a volume that is not the current boot volume, will not be possible. This means that you already have a data or system partition set on the basic disk and should not convert. It would be better to dual boot if you’re dead set on using a dynamic disk.
Conversion Method 2 – Command Prompt
If you happen to be more familiar with the Command Prompt, this one may be easier for you. Though, it does require one additional step to that of the Disk Management tool. Regardless, the end result will still be a basic disk converted from a dynamic disk.
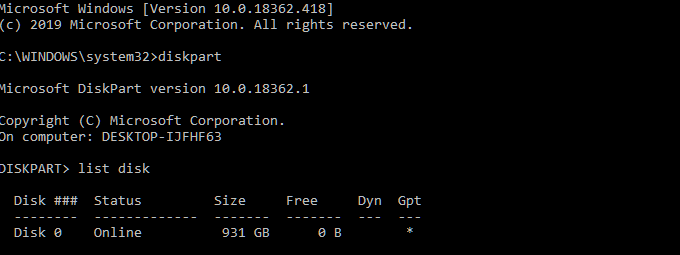
Start off by running the Command Prompt. You can do this by typing cmd into the taskbar search and running the result as administrator. While in the Command Prompt window, perform the following command:
This will pull up a list of all the available disks that can be found on your computer.The list will display the following information for each entry: disk number, status, size, the current amount of available space, and a Dyn (Dynamic DNS) and Gpt (GUID Partition Table).Annotate the number of the disk you’d like to convert as we’ll be using it in the next step.While still in DISKPART, enter the disk number you selected into the following command:
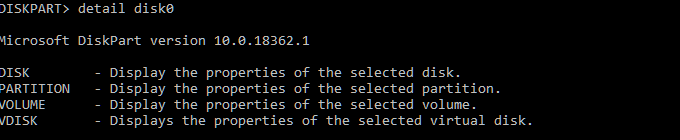
You should receive a similar confirmation message indicating that the disk has been selected.You will now need to preview and delete each volume located on the disk, one at a time.Type detail disk# where the # is the actual number of the disk selected.
Now type select volume #.
Then delete volume #.
Once every volume has been deleted, you can convert the dynamic disk into a basic one by typing convert basic.
Basic Into Dynamic Using The Command Prompt
Follow the above steps up to the part you retrieve a list of available disks in DISKPART. In this process, you won’t have to delete anything. Simply execute convert dynamic and the disk will do so. The only time you should receive a warning is when you’re attempting to convert a system disk. In which case, you’ll be prompted with a Virtual Disk Service error exclaiming that there is not enough space.