There are those who enjoy the ability to stream live, but don’t have a need to have their videos be available to the masses. Instead, they’d prefer to have more control over their stream and the content they produce. Open-source software, like Linux, is the best answer to this obstacle.
Thinking Ahead
Before you begin setting up your own personal streaming server, you should ask yourself a few questions. First, what quality of stream are you looking for? Next, how many viewers do you expect to pull in? Where will you store all of your streamed content? Who will have access to that content? System requirements can also be seen as a concern. However, there are no set rules on exactly what you’ll need in this regard, so do yourself a favor and experiment to see what works best for your goals. You’ll need to figure out which protocol will handle the audio and video portion of the streaming. Real-Time Messaging Protocol (RTMP) is a great choice but there are others, such as WebRTC, that might fare better in your situation. RTMP has broad support so we’ll focus on that for this article. Another thing to worry about is likely delays in your “live” streaming. Just because you go live doesn’t mean that everything will line up perfectly. Video streams need to be encoded, transferred, buffered, and displayed, so expect the need for a bit of tweaking in the stream’s attributes.
Linux Server Setup
Ubuntu Linux is my personal favorite, so that will be the version of choice here. For those who prefer a GUI option, Ubuntu Desktop is available.
Fire up the Ubuntu installer and choose the settings that best fit your needs. You’ll probably want to set some static network settings since this is going to be used as a server.Reboot the system after installation if it doesn’t do so automatically. Once the Ubuntu system boots up, install any updates that are available:
We’ll be using Nginx web server for this streaming server. Install it: Procure the RTMP module so Nginx can handle your media stream: Adjust Nginx’s configuration so that it can accept and deliver your media stream. Add the following code to the bottom of the config file: Save the config file as we’ll be using it later to create a working streaming server. Restart Nginx with its new configuration:
Streaming Software Setup
The server is ready, so now it’s time to set up your streaming software. Let’s use Open Broadcaster Software (OBS) in this run-through.
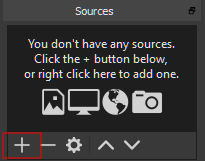
Head to the site and select the build for Linux. After the software launches, configure OBS with the settings that best match your hardware.Add a streaming source by clicking the + just under Source.
For testing sake, choose Display Capture, and enter a name for the source.Click the OK button, and OBS will mirror your desktop.Next, click the File tab and choose Settings.
In the Stream section, select set Stream Type to Custom… and enter the following URL into the Server field: In place of IPaddress, enter the IP address of your streaming server. Now create your own Stream Key and enter it into the Stream key box. Make it something you’ll remember and write it down. For added security, check the Use authentication box and add your preferred credentials. Finish with Apply followed by the OK button. Everything should now be configured for streaming. To begin your first stream, hit the Stream Now button.The button will change to Stop Streaming so long as everything was done correctly. Your stream’s bandwidth metrics will appear at the bottom of the OBS window.
Be Your First Viewer
There are plenty of open source media players that support RTMP, the most well-known of which is VLC media player. Install and launch this software, click the Media tab, and select Open Network Stream from the menu. Got your Stream Key handy? Type the path to your stream, and include the Stream Key you set up earlier, to the end of it. Should look like: Click Play and you’ll get a live view of your very own stream.
Additional Measures
Now that the basics have been achieved, limiting access to your streaming server and being able to record and save your videos are two other factors you may be interested in. By default, anyone can view your stream. This may go against the purpose of creating the server in the first place. You’ll want to set up limited access using a Linux firewall, .htaccess file, or the built-in access controls in the RTMP module. This choice is left up to you. The Nginx configuration provided here will only enable you to stream videos, but not save them. To add a storage option, in the Nginx config, just below the RTMP section, you can set up the stream recording options and provide a location to where you want your content saved and stored. Set an existing path in order to allow Nginx to write to it. Enter the following: application live { live on; record all; record_path /var/www/html/recordings; record_unique on;} That’s all you should need when setting up a live streaming server using the Ubuntu Linux OS. If you’re more interested in a non-live media streaming server, I would suggest the use of Plex in place of OBS.